Creating the GitHub Actions Workflow
In this section, we’ll create the GitHub Actions workflow that syncs your RDS database to Neon.
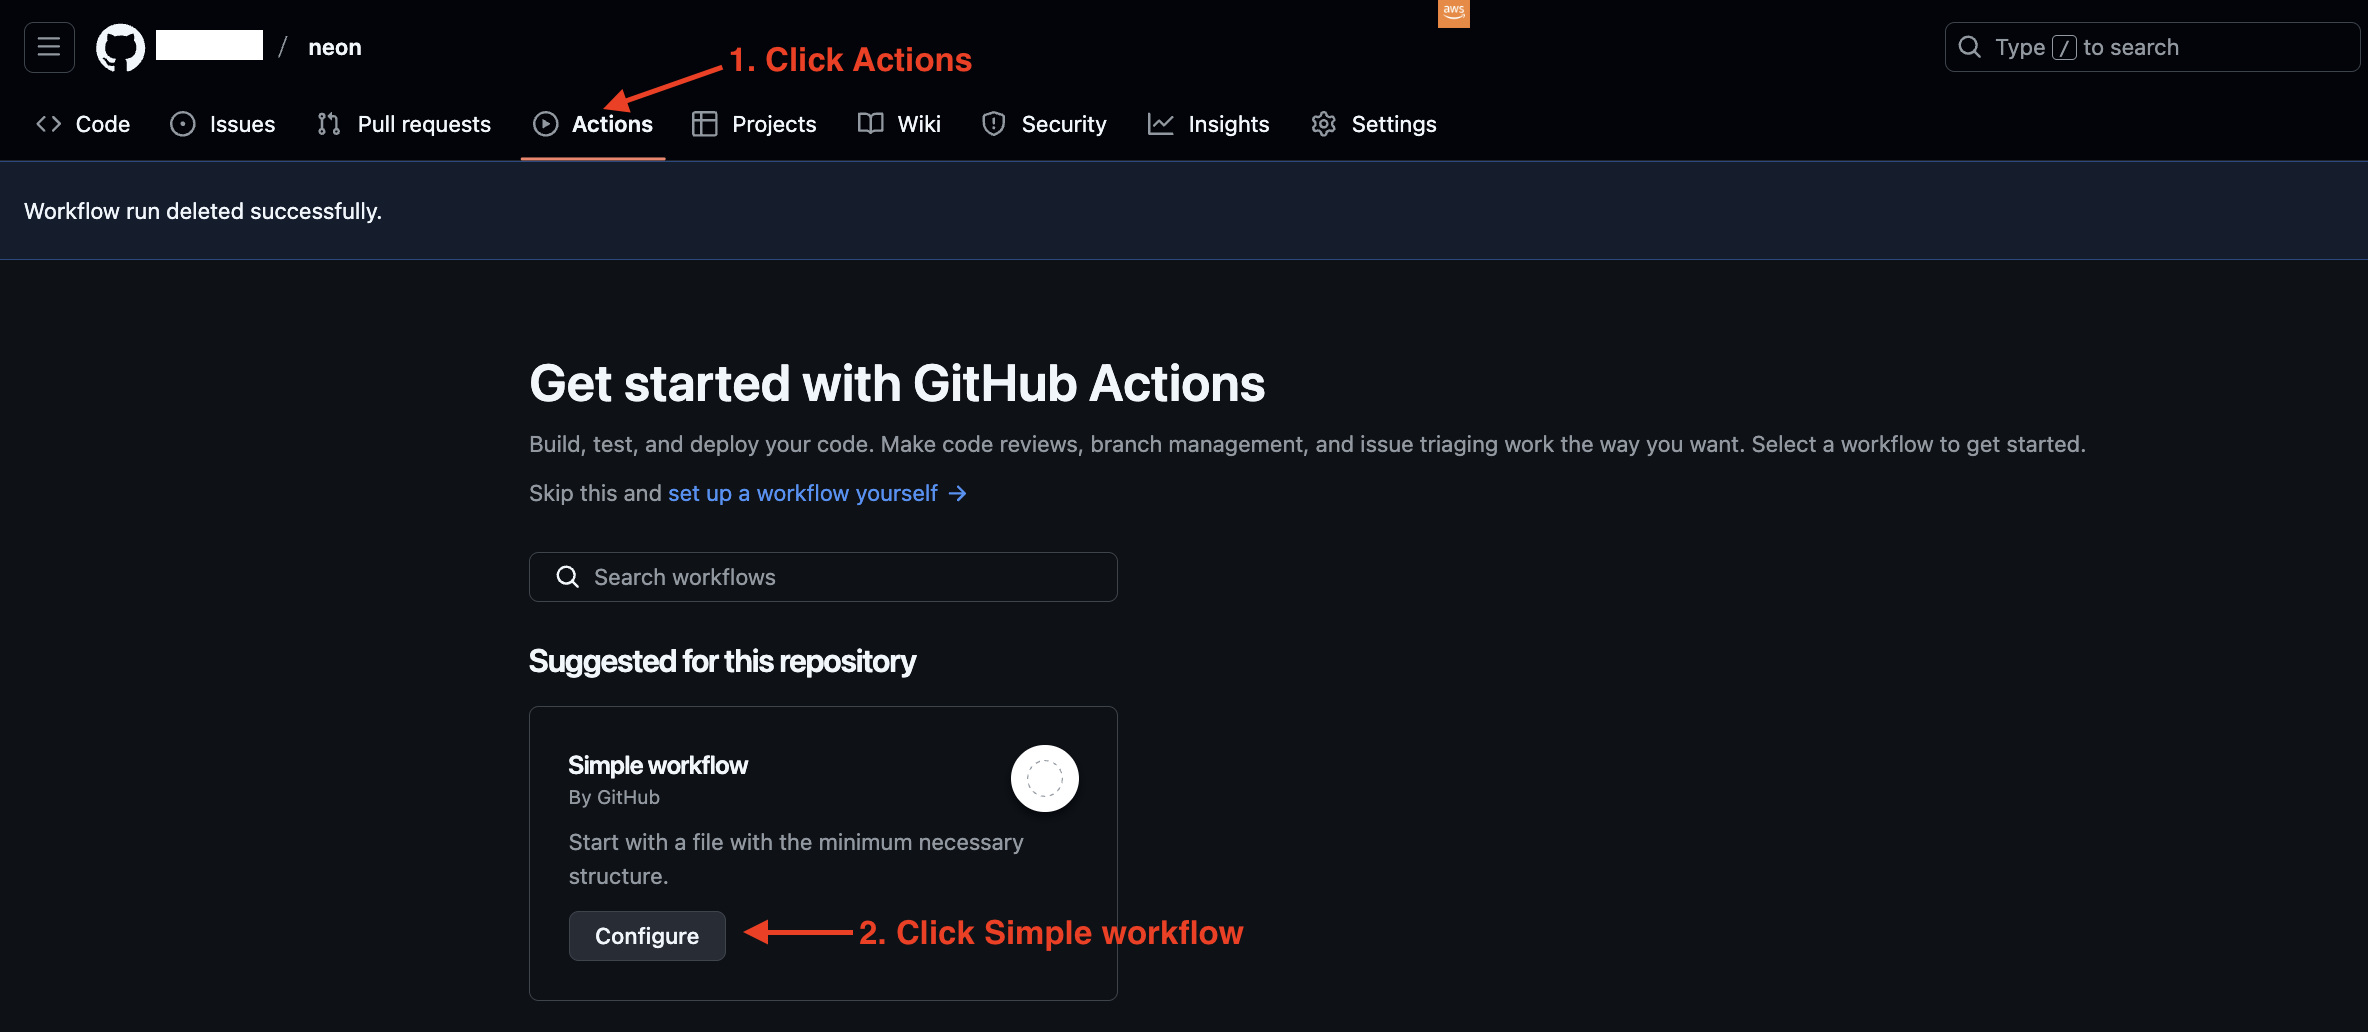
🚀 Creating the Workflow File
- In your repository, navigate to:
- Click on “Actions”
- Click “New workflow”
- Choose “Configure”
- Name your file
sync.ymland paste the following content:
name: Create Neon Twin
on:
 schedule:
   - cron: '0 0 * * *' # Runs every day at midnight
 workflow_dispatch: # Allows manual trigger
 push:
  branches: main

permissions:
 id-token: write
 contents: read

env:
 PROD_DATABASE_URL: ${{ secrets.PROD_DATABASE_URL }}
 DEV_DATABASE_URL: ${{ secrets.DEV_DATABASE_URL }}
 PG_VERSION: '16'

jobs:
 dump-and-restore:
   runs-on: ubuntu-latest
   steps:
     - name: Check out repository
       uses: actions/checkout@v3

     - name: Configure AWS credentials
       uses: aws-actions/configure-aws-credentials@v3
       with:
         role-to-assume: ${{ secrets.AWS_ACCOUNT_ROLE }}
         aws-region: ${{ secrets.AWS_REGION }}

     - name: Verify AWS Identity
       run: aws sts get-caller-identity

     - name: Get EC2 Instance ID
       run: |
         # First, let's see all instances with their tags
         echo "Checking all instances with VSCodeServer tag..."
         aws ec2 describe-instances \
           --filters "Name=tag:Name,Values=VSCodeServer" \
           --query 'Reservations[*].Instances[*].[InstanceId,Tags[*]]' \
           --output json

         # Now let's get our specific instance ID
         EC2_INSTANCE_ID=$(aws ec2 describe-instances \
           --filters "Name=tag:Name,Values=VSCodeServer" \
                     "Name=instance-state-name,Values=running" \
                     "Name=tag:aws:cloudformation:stack-name,Values=vscode-server" \
           --query "Reservations[0].Instances[0].InstanceId" \
           --output text)

         echo "Found EC2 Instance ID: $EC2_INSTANCE_ID"
         echo "EC2_INSTANCE_ID=$EC2_INSTANCE_ID" >> $GITHUB_ENV

     - name: Install Session Manager Plugin
       run: |
         curl "https://s3.amazonaws.com/session-manager-downloads/plugin/latest/ubuntu_64bit/session-manager-plugin.deb" -o "session-manager-plugin.deb"
         sudo dpkg -i session-manager-plugin.deb
         rm session-manager-plugin.deb

     - name: Check and Install Required Tools
       run: |
         if ! command -v nc &> /dev/null; then
           echo "Installing netcat..."
           sudo apt-get update
           sudo apt-get install -y netcat
         else
           echo "netcat is already installed"
         fi

     - name: Install PostgreSQL Client
       run: |
         sudo apt update
         yes '' | sudo /usr/share/postgresql-common/pgdg/apt.postgresql.org.sh
         sudo apt install -y postgresql-client-${{ env.PG_VERSION }}

     - name: Verify PostgreSQL Client Installation
       run: |
         pg_dump --version
         pg_restore --version

     - name: Parse DB URL and Start Port Forwarding
       run: |
         # Parse the PROD_DATABASE_URL
         DB_HOST=$(echo $PROD_DATABASE_URL | sed -n 's/.*@\([^:]*\).*/\1/p')
         DB_USER=$(echo $PROD_DATABASE_URL | sed -n 's/.*:\/\/\([^:]*\):.*/\1/p')
         DB_PASS=$(echo $PROD_DATABASE_URL | sed -n 's/.*:\/\/[^:]*:\([^@]*\).*/\1/p')
         DB_NAME=$(echo $PROD_DATABASE_URL | sed -n 's/.*\/\(.*\)/\1/p')

         echo "DB_HOST=$DB_HOST" >> $GITHUB_ENV
         echo "DB_USER=$DB_USER" >> $GITHUB_ENV
         echo "DB_PASS=$DB_PASS" >> $GITHUB_ENV
         echo "DB_NAME=$DB_NAME" >> $GITHUB_ENV

         # Start SSM session with explicit output to verify
         aws ssm start-session \
           --target ${{ env.EC2_INSTANCE_ID }} \
           --document-name AWS-StartPortForwardingSessionToRemoteHost \
           --parameters "{\"host\":[\"$DB_HOST\"],\"portNumber\":[\"5432\"], \"localPortNumber\":[\"15432\"]}" > ssm_output.log 2>&1 &

         # Store the SSM process ID
         SSM_PID=$!
         echo "SSM_PID=$SSM_PID" >> $GITHUB_ENV

         # Wait for port forwarding to be established and test the connection
         echo "Waiting for port forwarding to be established..."
         attempt=1
         max_attempts=30

         until nc -z localhost 15432 || [ $attempt -gt $max_attempts ]
         do
           echo "Attempt $attempt of $max_attempts"
           cat ssm_output.log
           sleep 5
           attempt=$((attempt + 1))
         done

         if [ $attempt -gt $max_attempts ]; then
           echo "Failed to establish port forwarding"
           cat ssm_output.log
           exit 1
         fi

         echo "Port forwarding successfully established"
         ps aux | grep ssm

     - name: Dump from RDS
       run: |
         echo "Dumping data from RDS to file..."
         PGPASSWORD=${{ env.DB_PASS }} /usr/lib/postgresql/${{ env.PG_VERSION }}/bin/pg_dump \
           -h localhost \
           -p 15432 \
           -U ${{ env.DB_USER }} \
           -d ${{ env.DB_NAME }} \
           -Fc -f "${{ github.workspace }}/prod-dump-file.dump"

     - name: Restore to Neon
       env:
         DEV_DATABASE_URL: ${{ secrets.DEV_DATABASE_URL }}
       run: |
         echo "Restoring data to Neon..."
         /usr/lib/postgresql/${{ env.PG_VERSION }}/bin/pg_restore -d "${DEV_DATABASE_URL}" --clean --no-owner --no-acl --if-exists "${{ github.workspace }}/prod-dump-file.dump"

     - name: Cleanup
       run: |
         echo "Cleaning up dump file..."
         rm -f "${{ github.workspace }}/prod-dump-file.dump"
         # Kill the port forwarding session
         pkill -f "ssm start-session"
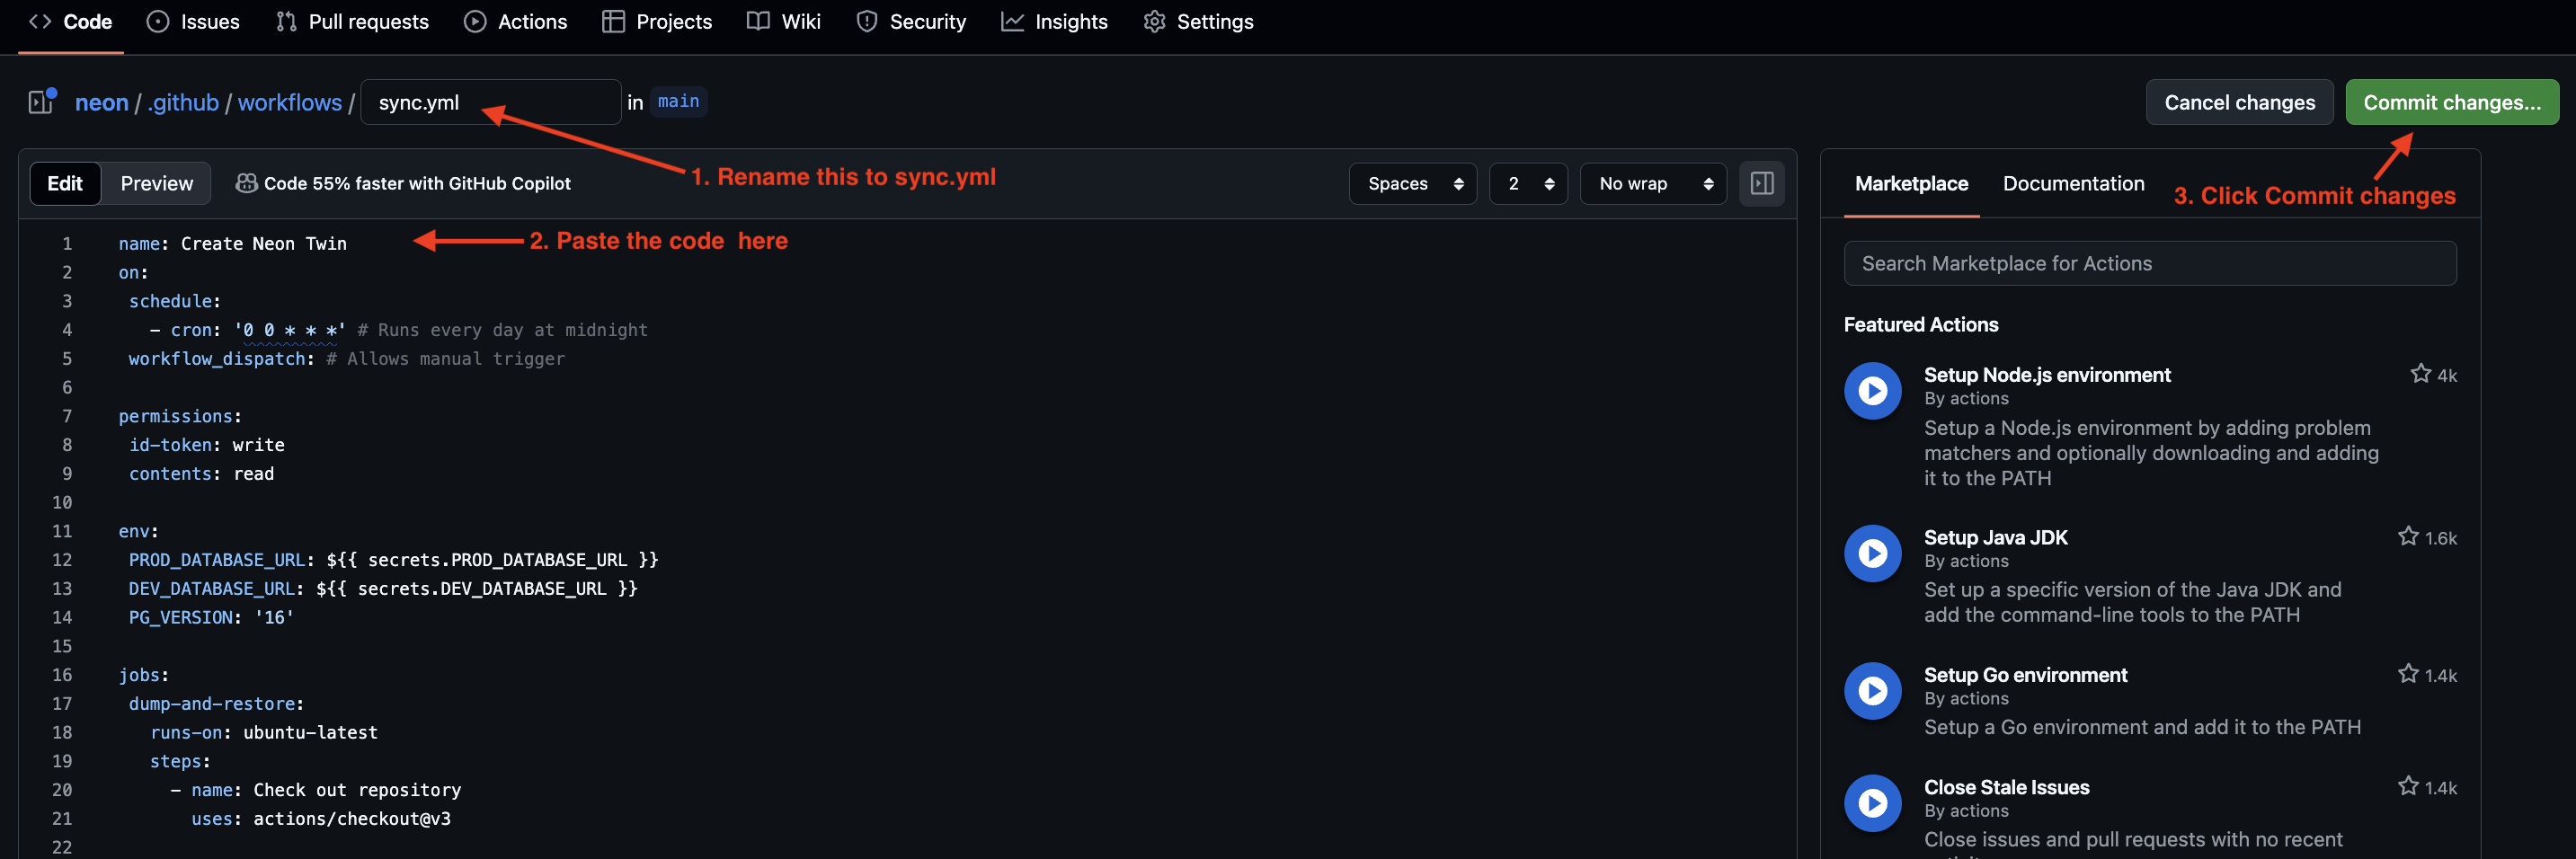
- Click “Commit changes” to save the workflow
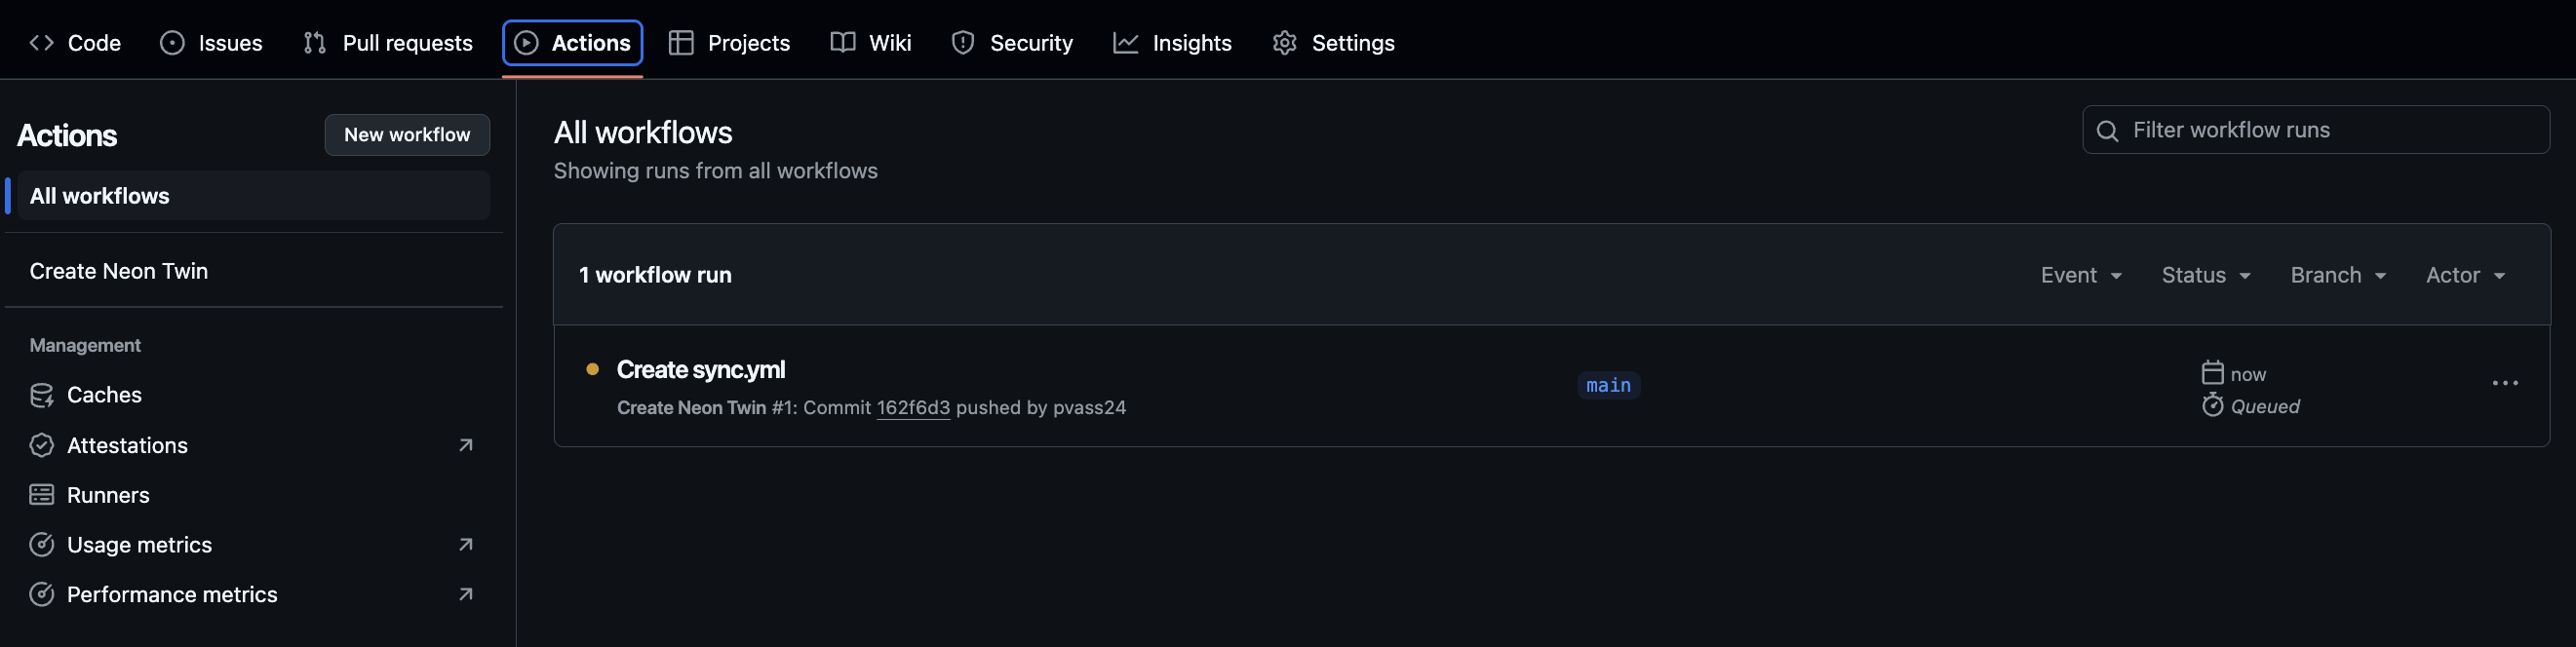
🔄 Monitoring the Sync Process
Automatic Initial Sync
When you first commit the workflow file:
- Navigate to the “Actions” tab in your repository
- You’ll see “Create Neon Twin” workflow starting automatically
- Click on the running workflow to see detailed progress
- This will take about 3-5 mins to complete
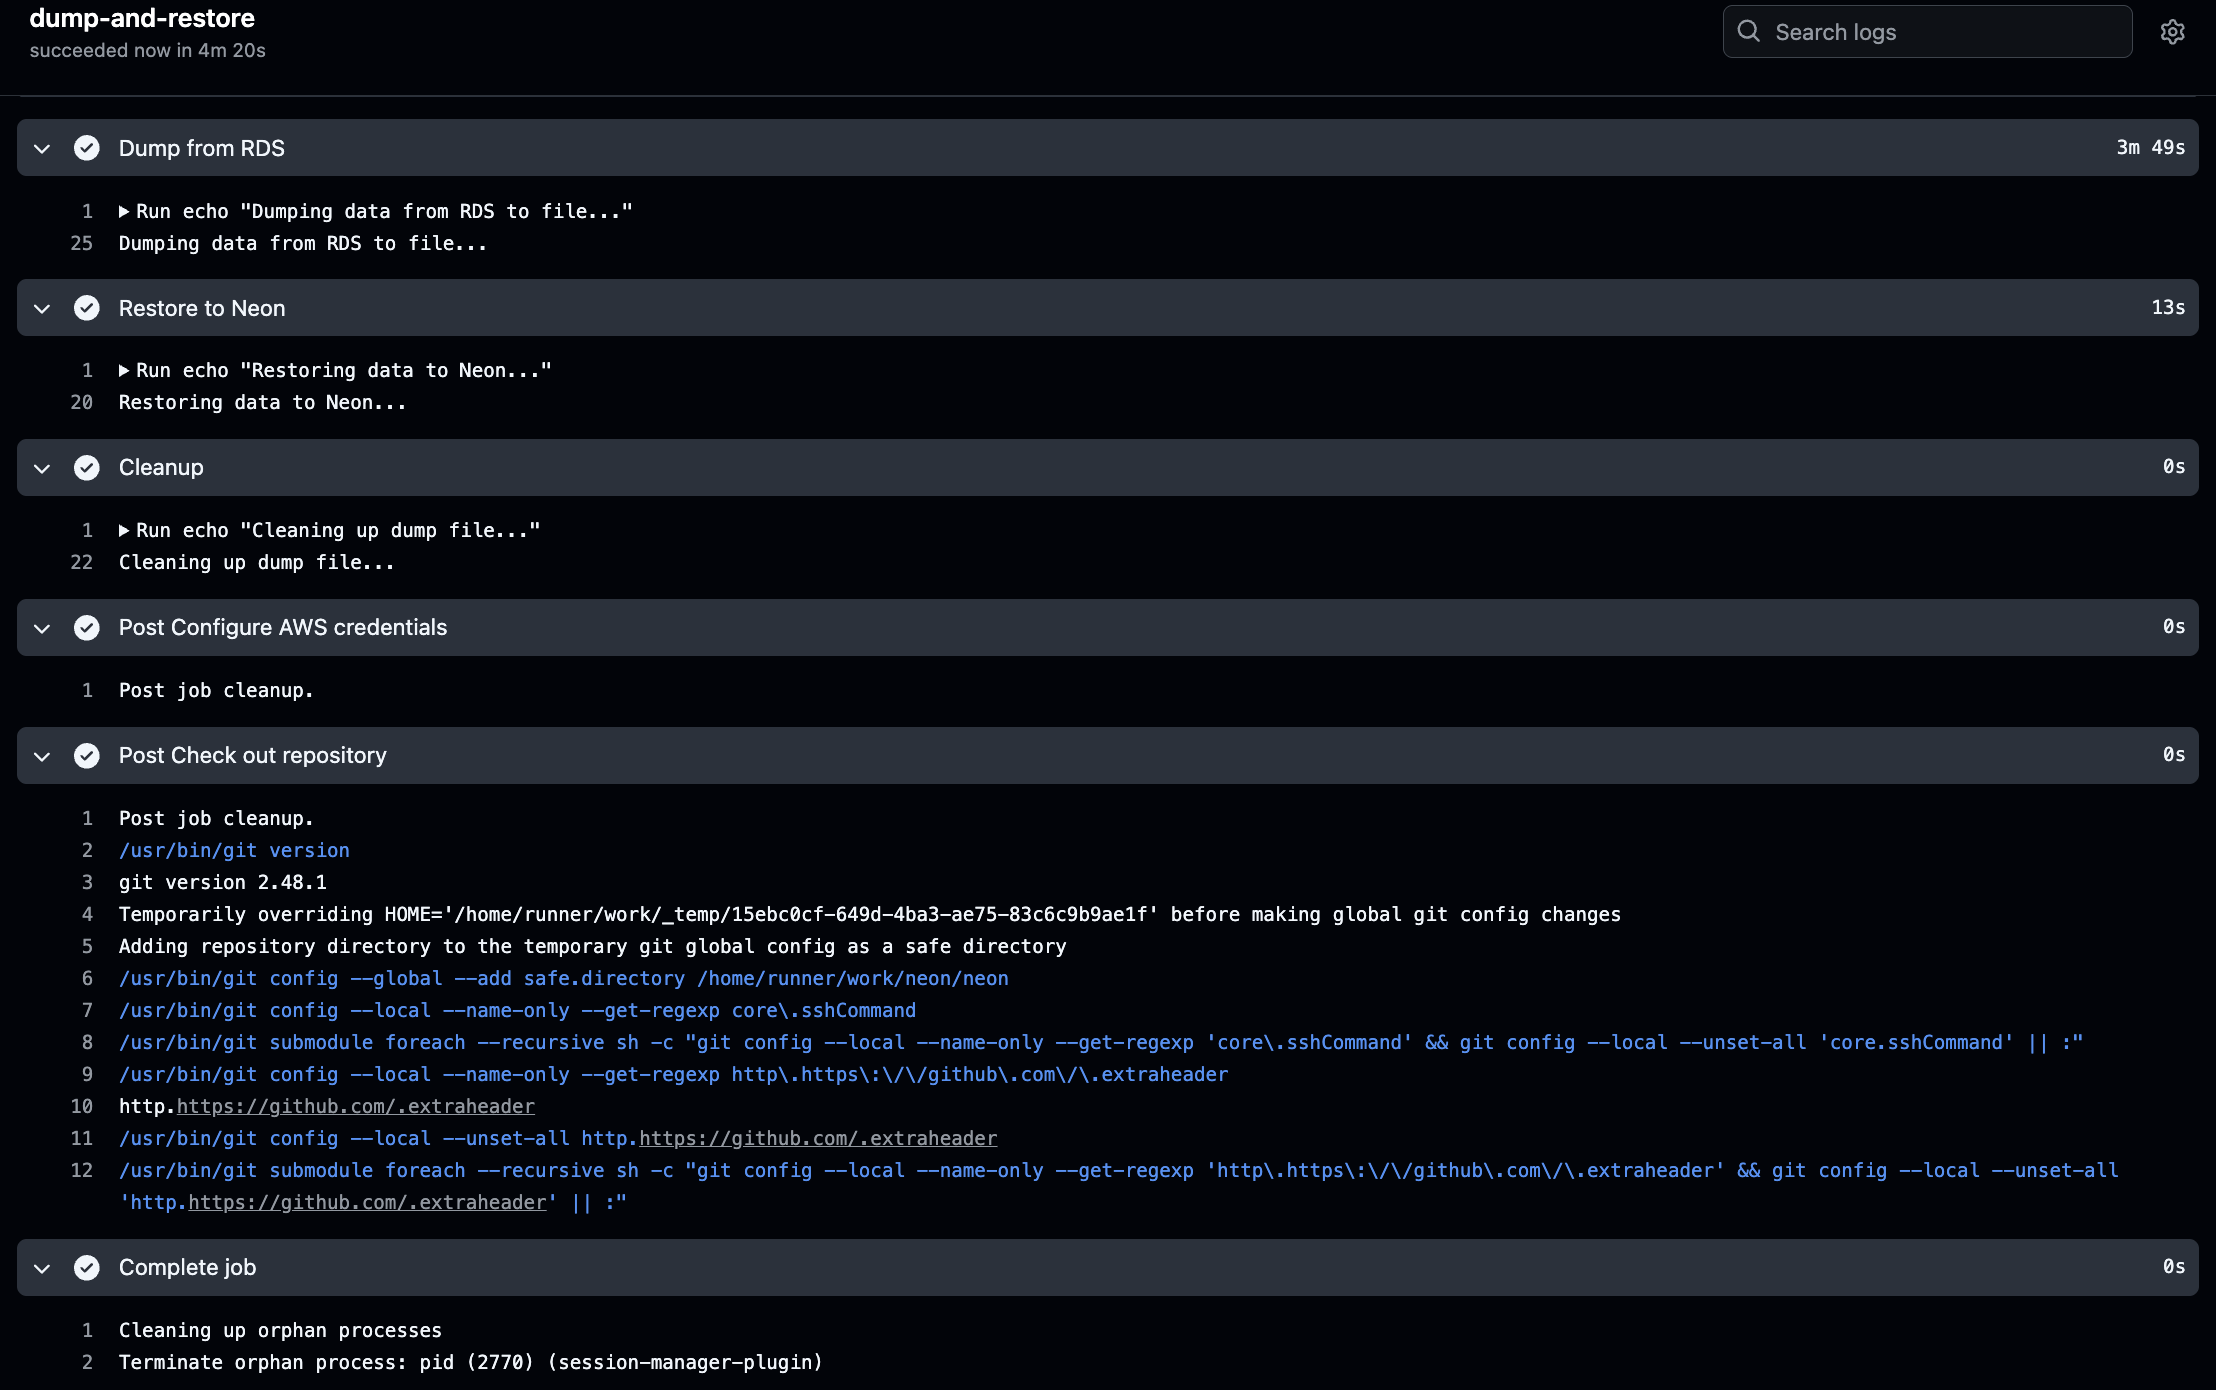
Understanding the Workflow Steps
You can monitor these key stages:
-
AWS Authentication
- Verifies OIDC connection
- Confirms AWS role assumption
-
Database Connection Setup
- Locates VSCode Server instance
- Establishes port forwarding
- You’ll see “Port forwarding established” when successful
-
Data Transfer
- “Dumping data from RDS to file…”
- “Restoring data to Neon…”
- Cleanup process
🎯 Check Neon DB
With your sync configured:
- Verify data in your Neon database
Connect to your Neon database on your VSCode server using the connection string that we set up in earlier steps.
psql $DEV_DATABASE_URL
and run the following query to verify the data:
SELECT d.dept_name, AVG(s.amount) AS average_salary
FROM employees.salary s
JOIN employees.department_employee de ON s.employee_id = de.employee_id
JOIN employees.department d ON de.department_id = d.id
WHERE s.to_date > CURRENT_DATE AND de.to_date > CURRENT_DATE
GROUP BY d.dept_name
ORDER BY average_salary DESC
LIMIT 5;
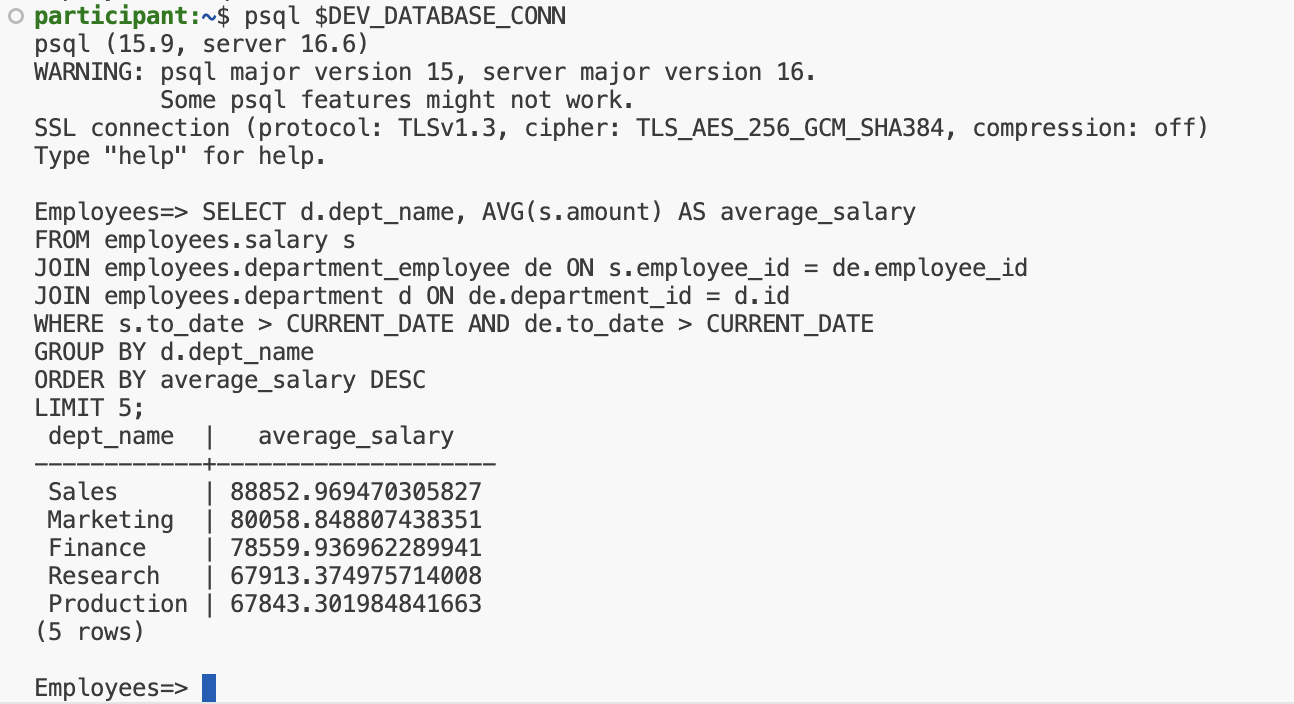
You should see the top 5 departments with the highest average salary.
Exit the database:
\q
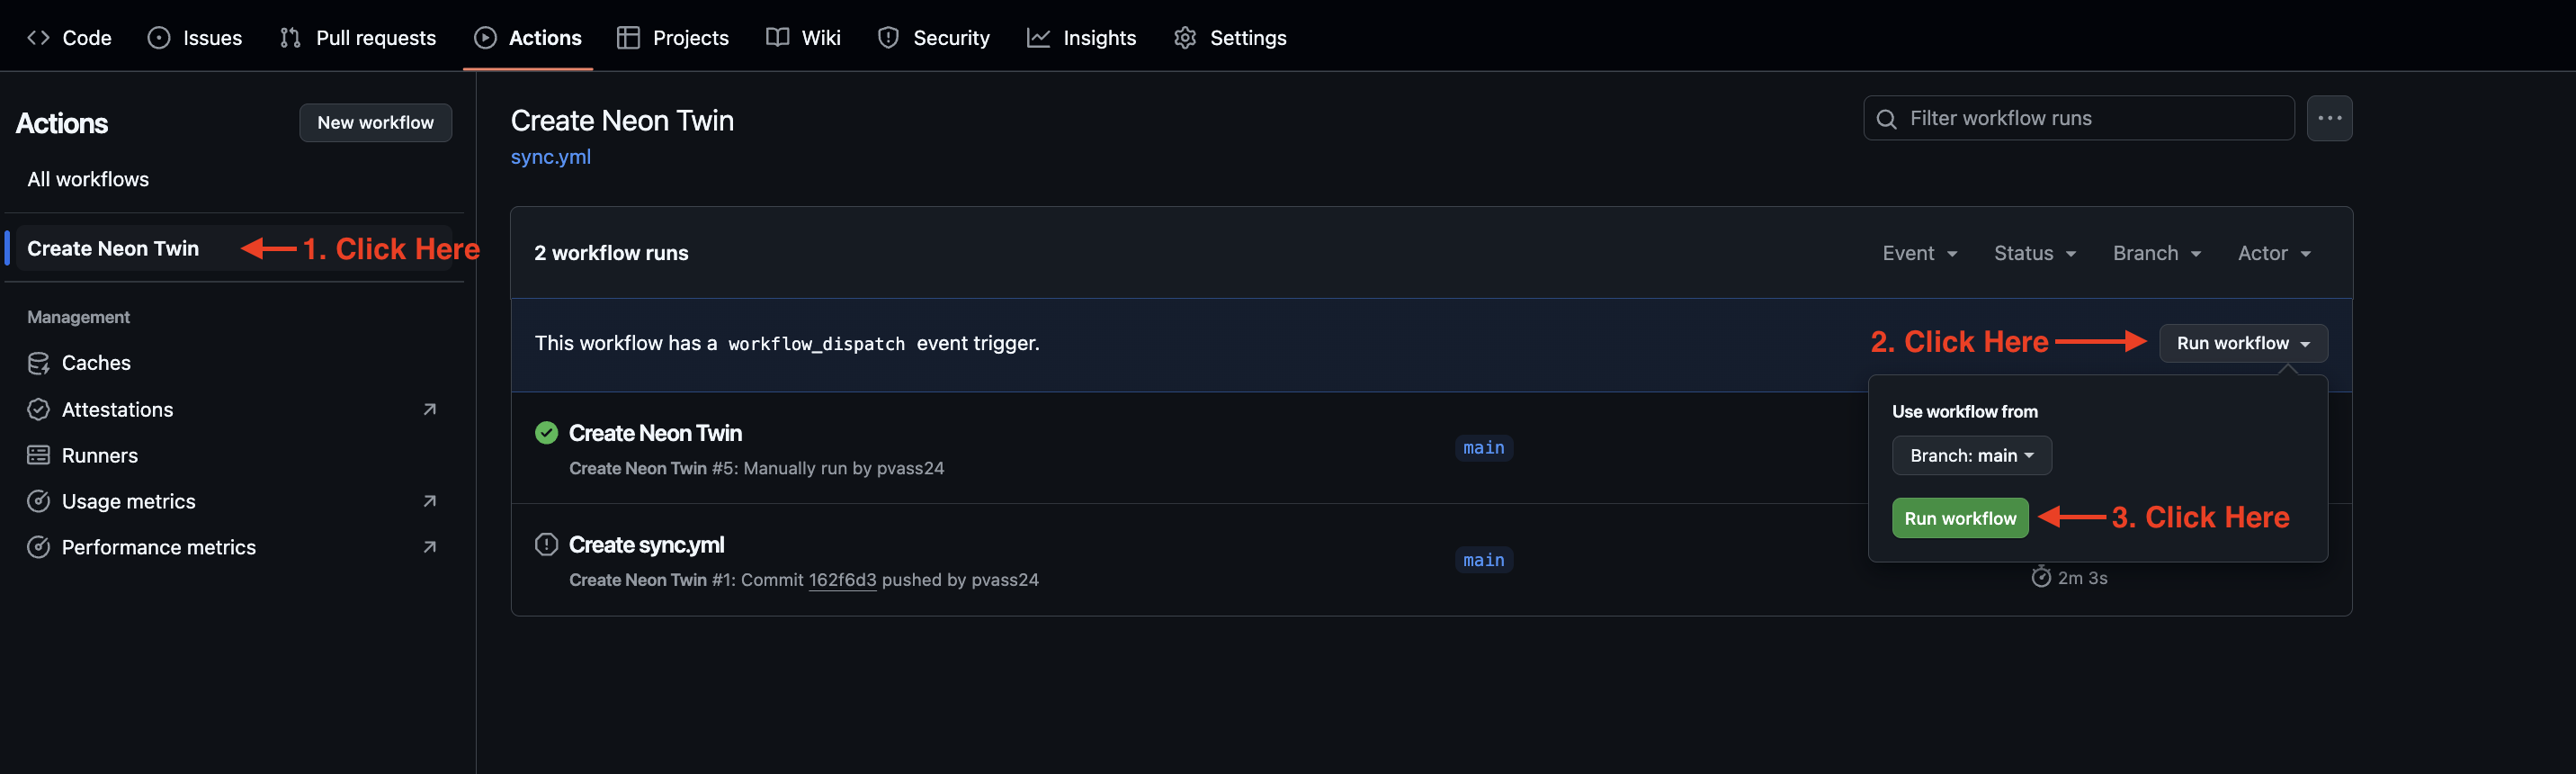
🚀 Manual Execution
To run the sync manually:
- Go to the “Actions” tab
- Click “Create Neon Twin”
- Select “Run workflow”
- Click the green “Run workflow” button
🔍 Troubleshooting
If you see issues:
- Click on the failed step to expand logs
- Check RDS connection details
- Verify Neon database URL
- Confirm AWS permissions
📅 Scheduled Runs
- The sync runs automatically at midnight daily
- Check “Actions” tab for historical runs
- Each run shows duration and status